Cisco 702W
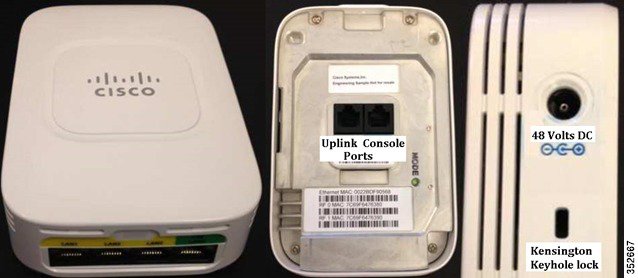
The new Cisco 702W offers a solution that has been needed for a long time for both residence halls/apartments and for retrofitting in buildings where installing additional wiring is not always practical. Combining an AP intended for low wall mounting with a 4-port switch, it is a nearly ideal solution for many applications.
The 702w does, however present some challenges as compared to other enterprise APs due to the ports which may need to be configured to one or more vlans other than the native wireless vlan used. In order to support the new switchport feature, I highly recommend upgrading the controllers 8.0.100.0 or greater so that port settings are supported directly in the GUI. Next, you will need to configure the switch-port to correctly trunk the vlans. For the following example lets assume that you have 3 vlans: vlan 8 is the office subnet,vlan 9 is the general subnet and vlan 10 is the Wi-Fi subnet and you are connecting to gigabit ports. To configure a Cisco switchport to work with the 702w you would use the following commands:
# conf t
(config)# int gig s#/m#/p#
(config-if)# switchport mode trunk
(config-if)# switchport trunk native vlan 10
(config-if)# switchport trunk allowed vlan 8,9,10
(config-if)# switchport nonegotiate
(config-if)#end
#wr
If you are configuring a Catalyst switch an additional step may be needed:
# conf t
(config)#int gig s#/m#/p#
(config-if)# switchport trunk encapsulation dot1q
(config-if)# switchport mode trunk
(config-if)# switchport trunk native vlan 10
(config-if)# switchport trunk allowed vlan 8,9,10
(config-if)# switchport nonegotiate
(config-if)# end
# wr
You will now have wireless traffic on vlan 10 and you will be able to select vlan 8 or 9 for the 702w switchports from the controller GUI. Don’t forget to allow the native vlan. IOS will allow you to set a native vlan without adding it to the allowed vlan list — yup, I forgot once, it didn’t work very well.
You can also configure a range of ports by using
(config)#int range gig s#/m#/p#-p#
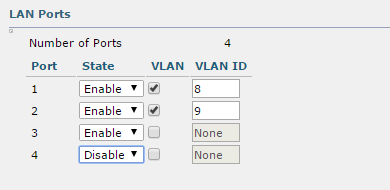
Once the 702w is up and running, you will need to enable any ports that you want to use. This is done in the controller GUI (assuming you have a current version) and is a simple matter of selecting a few options. In the screenshot below, you can see that 3 ports have been enabled and ports 1 and 2 assigned to VLANs 8 and 9 respectively. Also, note that port 3 is enabled but not assigned to a VLAN which will put it on the native VLAN (VLAN 10 in this example). Normally, you would not put a wired port on the native VLAN, but it can be done. Port 4, in this example, is disabled and will not allow any traffic.
One last note: Mounting is pretty straightforward, but to secure the AP to the mounting bracket you must install a VERY small machine screw with a T-5 Tamper Proof head. Screwdrivers for this are incredibly hard to find. The one I finally located was the Eclipse ECL-SD-083-T5H. A search for that part number should help you find what you need.
Old APs and Certificates
After a recent upgrade, I had several APs that would not join the controller. This was a first for me since the APs were visible to the controller but were not allowed to associate. This only happened with a handful of our oldest AP model (1131 ag) while other, seemingly identical units had no issues.
The problem was that the built in certificates — Manufacturer Installed Certificate (MIC), Self-Signed Certificate (SSC), or both — on these units were old and the new controller version rejected them as expired. The workaround is to tell the controller to ignore the certificates. This is done in CLI with the following command:
(WLC)>config ap cert-expiry-ignore {mic|ssc} enable
So, if you need to ignore both the MIC and the SSC you would enter:
(WLC)>config ap cert-expiry-ignore mic enable
(WLC)>config ap cert-expiry-ignore ssc enable
AP Can’t Find the Controller
I recently had a problem with some AP that were stuck in a loop and unable to find a path home. I was able to eventually get them to bind to the controller by consoling directly into the AP and issuing the following commands:
# capwap ap ip default-gateway <ap_default_gateway>
# capwap ap ip address <ap_ip_address> <subnet_mask>
# capwap ap controller ip address <controller_ip_address>